How to Make a Monogram in Cricut Design Space
Ultimate beginners guide on creating custom monograms with Cricut Design Space software.
With monograms being red hot on fashion meters everywhere right now, it is only the matter of time the idea to make a monogram in Cricut Design Space will cross your mind.
But where and how do you start if you've never make monograms in Cricut Design Space before?
The goal of this tutorial to provide you with detailed Cricut monogram guide with clear step by step instructions. It will cover all the main monogram sources and the ways they can be used in Design Space to get the best final results, so stay tuned!
Where do you get Cricut monograms from?
In general, there are 3 main ways to get monogram design:
-
Use specialized Monogram Fonts.
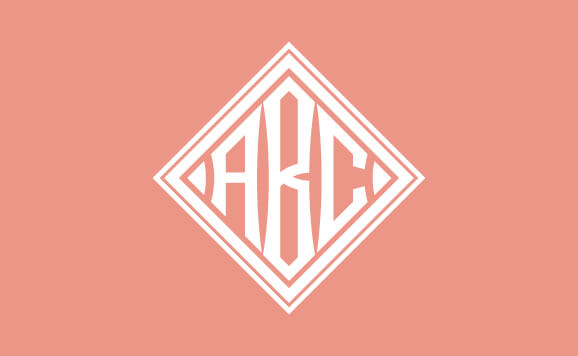
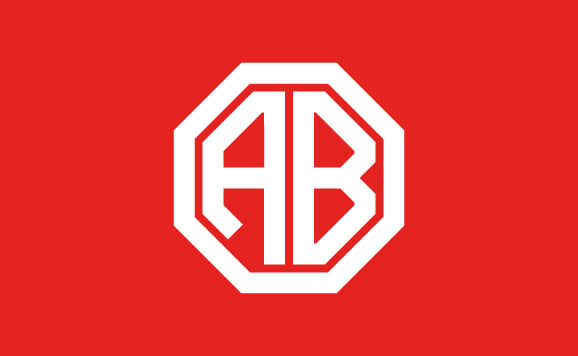
Most popular way by far, these comes in all forms of shapes such as diamond, circle monogram, long thin rectangle, square shape, split monogram, etc. They are usually distributed via true-type monogram fonts, separate letter files in vector formats or online monogram makers.
-
Combine Monogram from regular fonts.
Any serif font can be turned into a simple monogram by making middle letter larger, combining different styles fonts together, stacking letters, etc.
-

Design and Draw one yourself :p
Just draw a custom vector monogram file in your favorite editor software or even in a Cricut Design Space itself. Easy peasy, right?
While the latter two are self explanatory, it can be quite a challenge to deal with monogram fonts in Design Space for the first time.
This guide will focus on all the ways you can get and use monogram font based monograms in Cricut Design Space. It will cover using true type fonts, separate letter files, all-in-one cut files, Cricut-ready monogram maker files along with pros and cons. Bonus: We will also show you how to make a monogram initials in Cricut Design Space from regular free fonts, so keep reading!
Before we begin, make sure you are next to computer with Cricut Design Space software installed. You can always get latest version from the Cricut's official download page
All the methods listed below are displayed in order of difficulty, from easiest to most time-consuming.
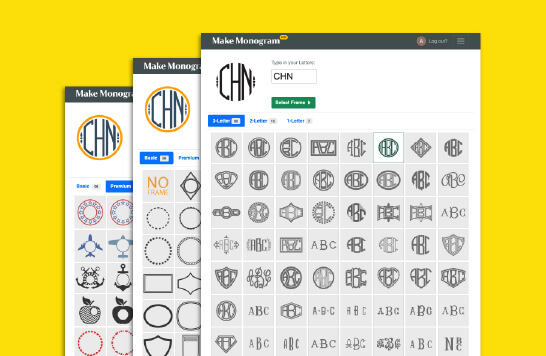
1. Online Monogram Makers
By far the easiest way to make a monogram in Cricut Design Space, good online monogram maker will provide you with a way to create vector Cricut-ready monogram files in seconds without feeling overwhelmed.
And by the "good" monogram maker, we mean a tool that looks and works great on any device, has an extensive selection of Cricut-ready monogram fonts and frames, and provides an instant download of the monogram in vector (SVG) format.
In this tutorial, we are using our own monogram maker as an example. Its mobile-friendly interface gives you an instant free access to largest selection of specialized paid monogram fonts and frames, and it is free for commercial use too!
Here are the detailed instructions on how to use monogram makers to make monogram in Cricut Design Space:
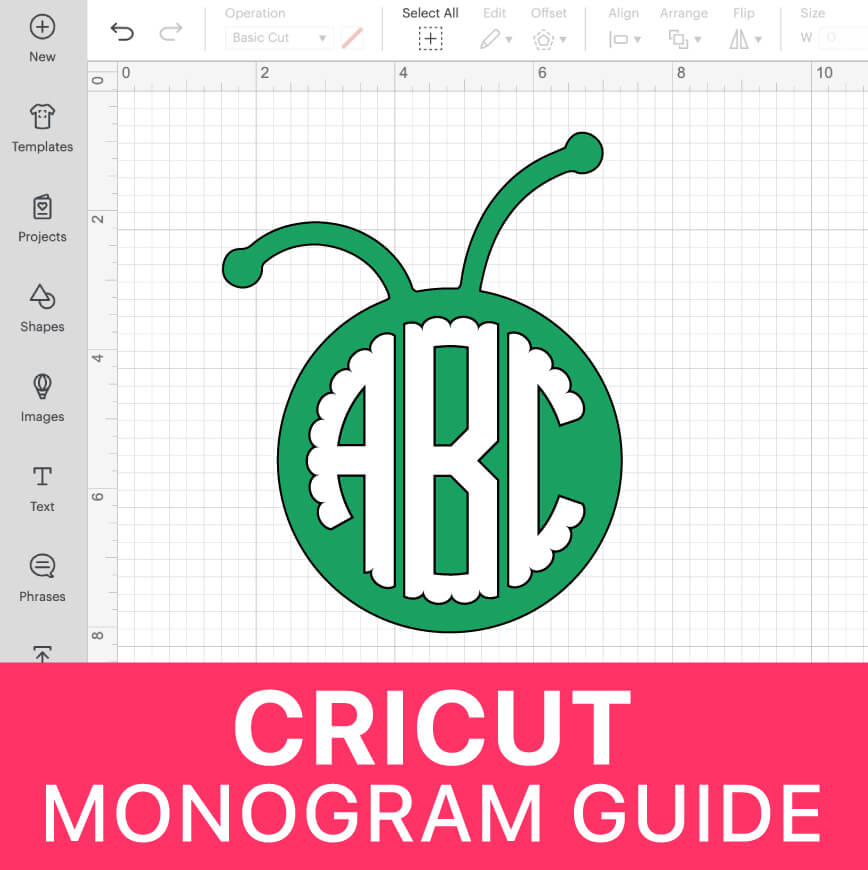
1. Make Monogram with Maker.
Go to Monogram Maker. Enter your initials in the text box, select the desired font and frame style and color, and then download the file in SVG format.
2. Open Cricut Design Space.
Start a new project by clicking "New Project" button in the top-right corner.
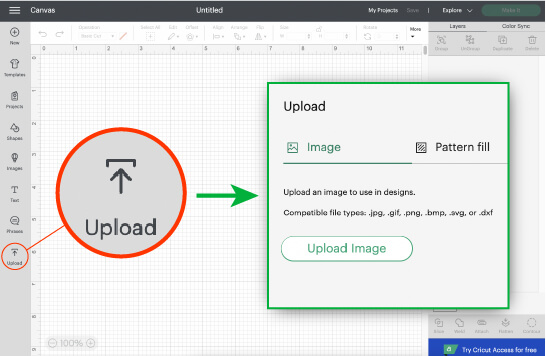
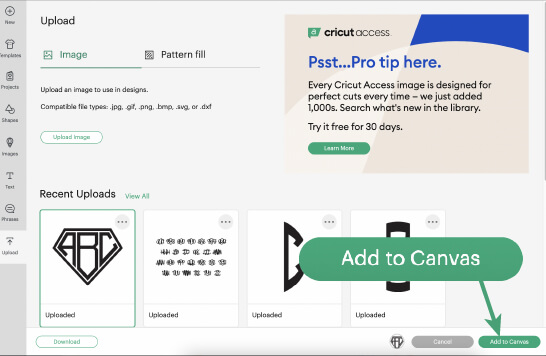
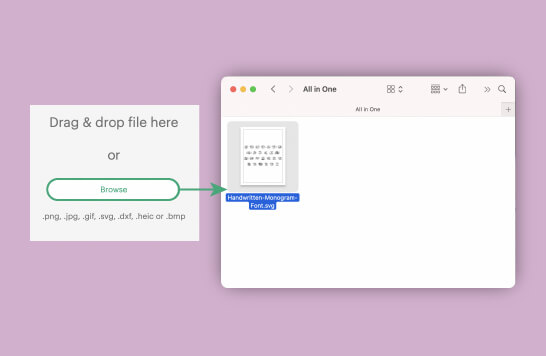
3. Click the "Upload" button.
It is in the bottom left corner, and then click the "Upload Image" button on the next screen.
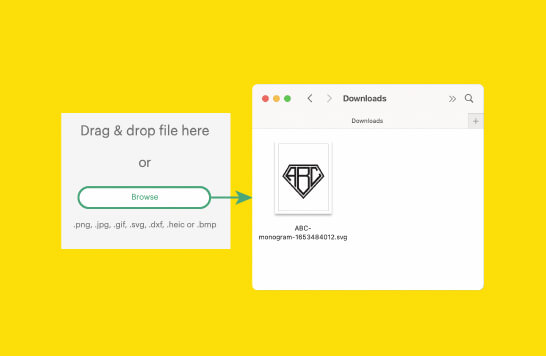
4. Locate your downloaded files.
On the next screen, drag and drop your monogram SVG file or click the "Browse" button to locate and open your downloaded file.
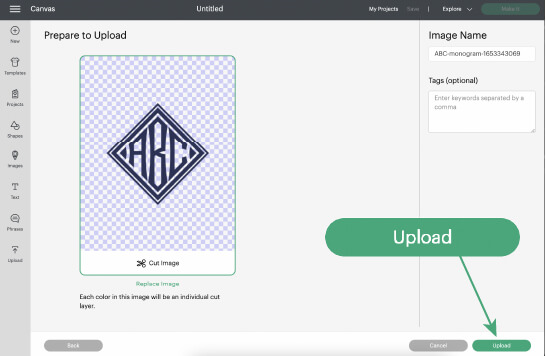
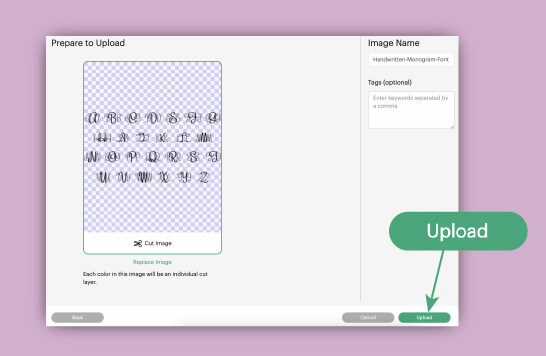
5. Check the design and upload.
Verify that your design looks okay in the preview window and then click the "Upload" button.
6. Insert uploaded design.
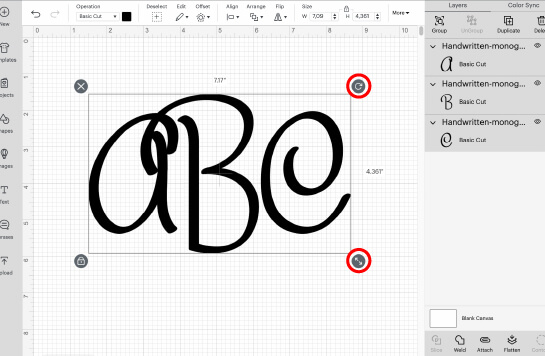
Now simply insert your uploaded monogram file by selecting it first and then clicking on "Add Canvas" bottom.
7. Make the adjustments if needed.
Feel free to do any adjustments to the design such as scaling, repositioning, adding and removing the elements if needed.
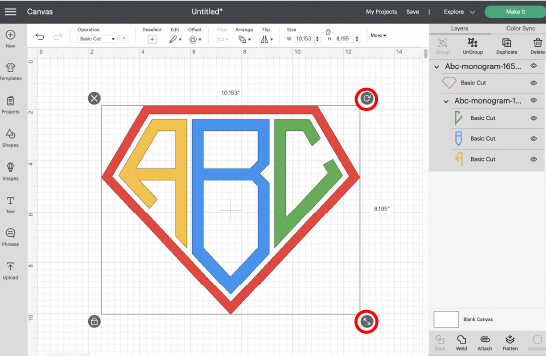
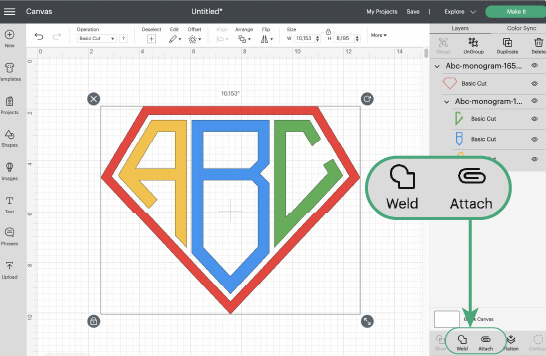
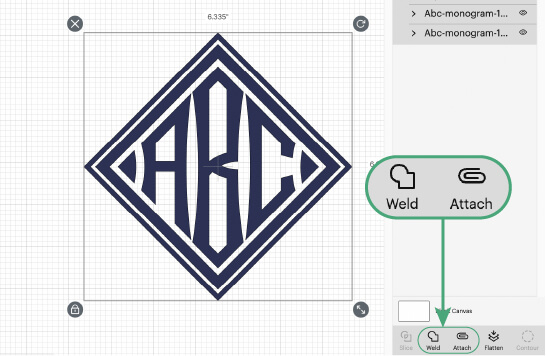
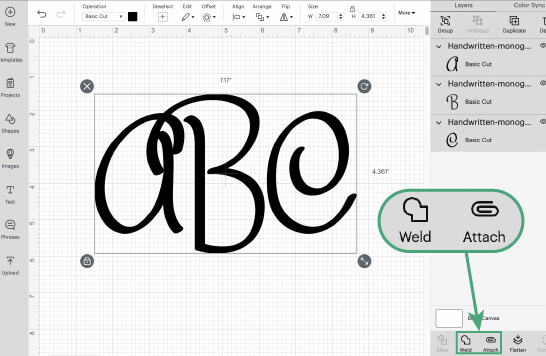
8. Final pre-cut preparations.
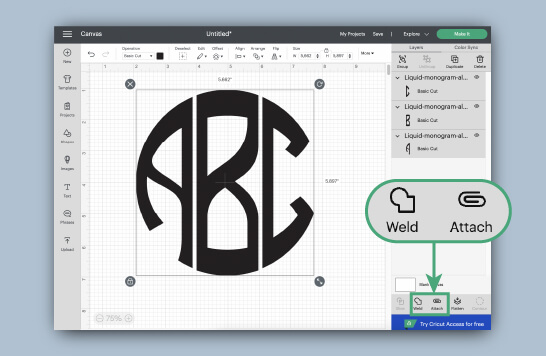
Prior cutting the monogram, make sure to use a "Weld" or "Attach" tool depending on whether the letters are touching (kissing) or not touching each other.
And here's you have a monogram in your Cricut design space. Enjoy!
Here is also a video tutorial too:
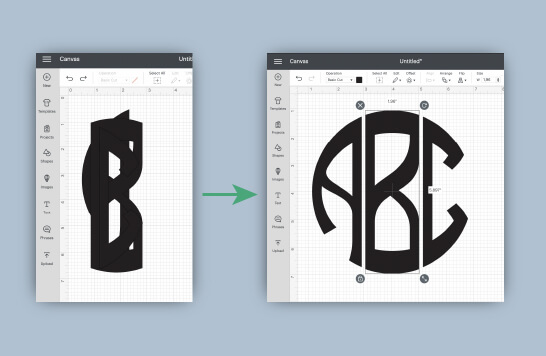
2. True Type Monogram Fonts
Most of the monogram font designs available today originated from true type monogram fonts (fonts in .otf and .ttf formats). They offer the largest selections of different monogram styles and shapes for any occasion. Once installed on your computer, they allow you to create a monogram simply by typing the desired initials right in Cricut Design Space canvas area.
There's just one major problem when dealing with true type monogram fonts: 95% of paid and free monogram fonts available on the market are completely not suitable for cutting.
Created exclusively for print publications and such, these fonts often have imperfections and flaws rendering them useless for Cricut machine or any other cutting machine or software. Other times, you will come across the fonts which produce a full 3-letter monogram with each letter you type, forcing you to jump through multiple hoops just to form a simple monogram you're after, including removing the unwanted letters, juggling separate layers and re-aligning the initials.
But, luckily things had changed in the recent years with the advances in font creation techniques and recent introduction of many high-quality monogram fonts on the market. There are now "TRUE" true type monogram fonts available that are 100% Cricket compatible and will allow you to create a monogram just by typing as you would with a regular font.


Our extensive monogram font library feature over 80 high quality Cricut-ready true-type monogram fonts that you can access for free today. You can also search for a free monogram fonts on Google or download fonts from specialized sites such as Myfonts.com, Dafonts.com, Creative Market.com, HungryJpeg.com etc, just make sure they are cutting machine compatible.
Here are the detailed instructions on how to install and use true type monogram fonts with your Cricket Design Space:
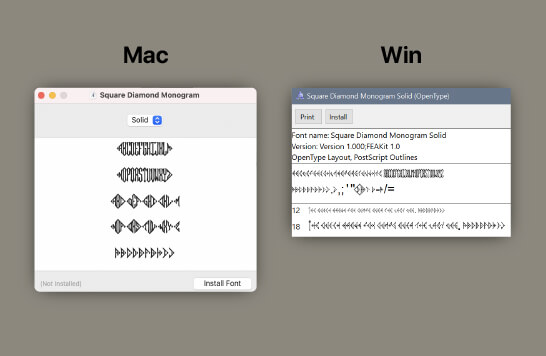
1. Locate and install your font file.
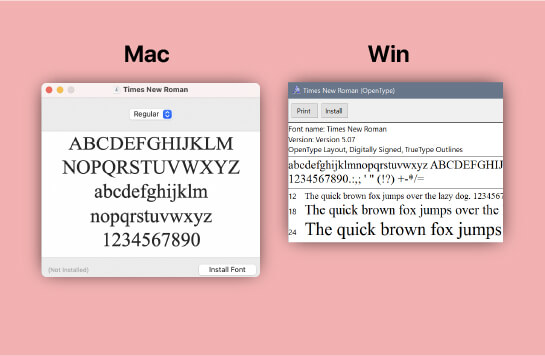
Locate true type font in OTF or TTF format and double click the font file and follow the on-screen prompts to install the font on your system. Pro tip: It might be necessary to restart your software or computer before using the font for the first time.
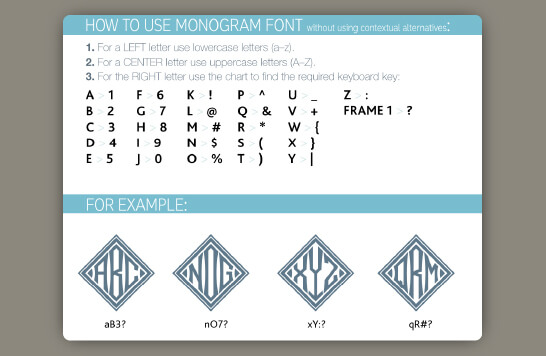
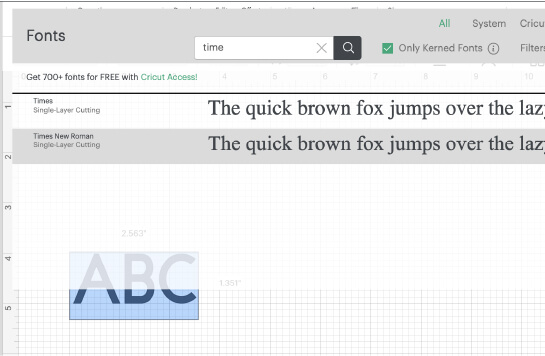
2. Get your text combination.
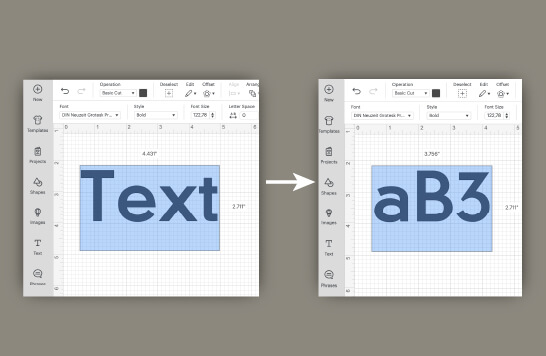
Refer to your specific font instructions to see what characters are mapped to what keyboard keys. For this example we will follow this chart that instructs us to use "aB3" text combination to get an "ABC" monogram.
3. Replace Text with your own.
Click the "Text" icon in the left side panel and then replace word “Text” with text combination from Step. 3 (in our case "aB3").
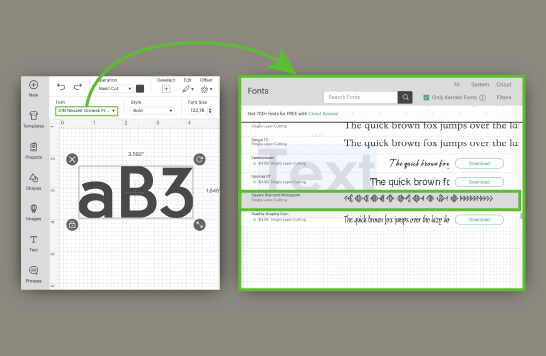
4. Select your desired font.
Click on the font drop down menu above the canvas field and then scroll down or use the search box to locate and use your installed font. Please note that not all monogram fonts have their preview properly displayed by Cricut here.
5. Make the adjustments if needed.
Feel free to ungroup the monogram initials and do any adjustments to the design such as scaling, repositioning, adding and removing the elements if needed.
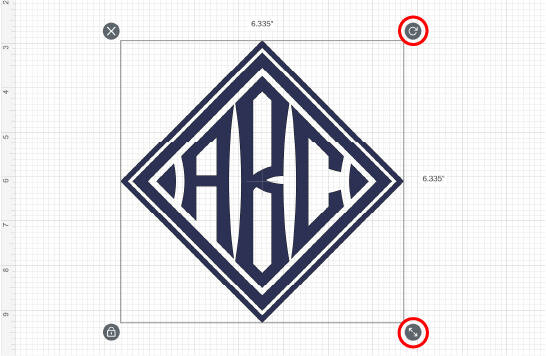
6. Final pre-cut preparations.
Prior cutting the monogram, make sure to use a "Weld" or "Attach" tool depending on whether the letters are touching (kissing) or not touching each other.
And here you have a monogram made from the true-type font. Enjoy!
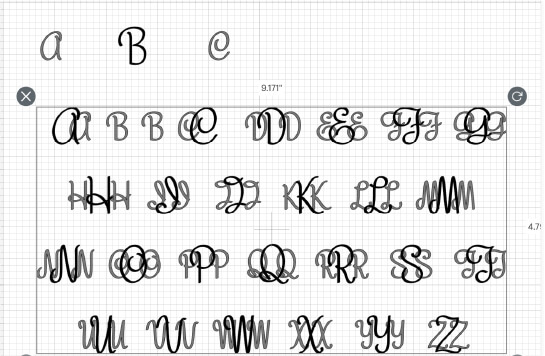
3. Monogram Letter SVG files
Recently, there has been a surge in popularity of so called "monogram alphabets" with each font letter as a separate file in SVG format. These SVG files are essentially just copies of true-type monogram fonts broken into separate files, which are often optimized for use with Cricket and other cutting machines.
The reason for such popularity is once again due to the fact the original font files are simply not suitable for use with cutting machines as is, so these optimized SVG packs were the only way to bridge that gap.
There are thousands of such SVG fonts available for sale as well as free on sites such as Etsy, Creative Market, CreativeFabrica, HungryJpeg, etc.
Here are the instructions on how to use a separate SVG letter files to create your own monogram in Design Space:
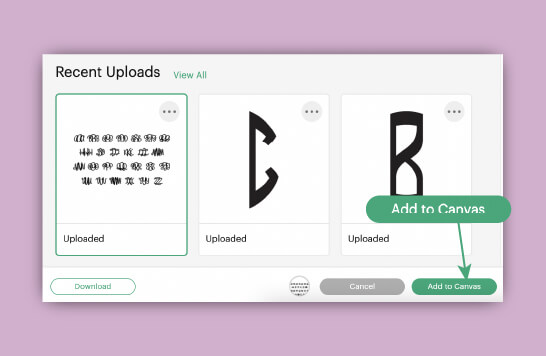
1. Click the "Upload" button.
Start a new project and then click the "Upload" button in the bottom left corner, then click "Upload Image" button on the next screen.
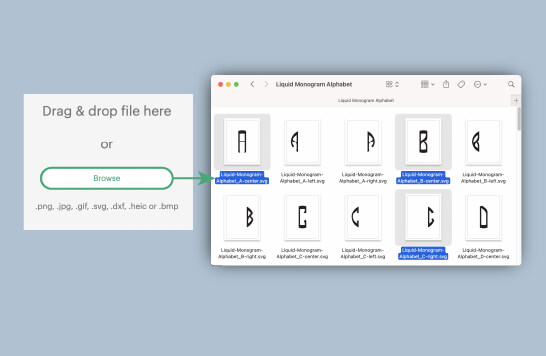
2. Locate your downloaded files.
On the next screen, drag and drop your SVG file or click the "Browse" button to locate and open your downloaded file.
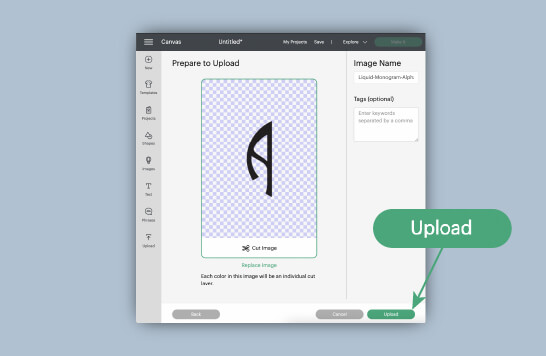
3. Check the design and upload.
Verify that your design looks okay in the preview window and then click the "Upload" button. Repeat the upload process for each of three letters.
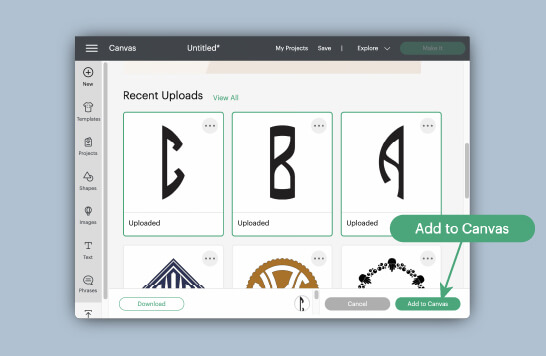
4. Insert uploaded designs.
Once all three initials are uploaded, select them all and click "Add to Canvas" button to insert them into your project.
5. Make the adjustments if needed.
Arrange and position first initial, middle initial and last initial to form a perfect monogram. Pro tip: Use Canvas field guide lines to precisely position your initials next to each other.
6. Final pre-cut preparations.
Prior cutting the monogram, make sure to use a "Weld" or "Attach" tool depending on whether the letters are touching (kissing) or not touching each other.
Enjoy!
4. All-in-One SVG monogram letter files
There is even a more convenient way to use SVG monograms in Cricut Design Space: it is to use the so called All-in-One SVG font files. These files are usually consist of a single SVG file that has all the font letters conveniently grouped on the same page.
Such structure allows you to load all the required letters in one piece and drastically reduces the amount of required steps and time needed to create a monogram in Design Space.
You can usually get the all-in-one SVG files from the same sources you would get their separate SVG letters packs from.
Here is how to make a monogram with all-in-one SVG file in Cricut Design Space:
1. Open Cricut Design Space.
Start a new project by clicking "New Project" button in the top-right corner.
2. Click the "Upload" button.
It is in the bottom left corner, and then click the "Upload Image" button on the next screen.
3. Locate your downloaded file.
On the next screen, drag and drop your SVG file or click the "Browse" button to locate and open your downloaded file.
4. Check the design and upload.
Verify that your design looks okay in the preview window and then click the "Upload" button.
5. Insert uploaded design.
Now simply insert your uploaded all in one svg file by selecting it first and then clicking on "Add Canvas" bottom.
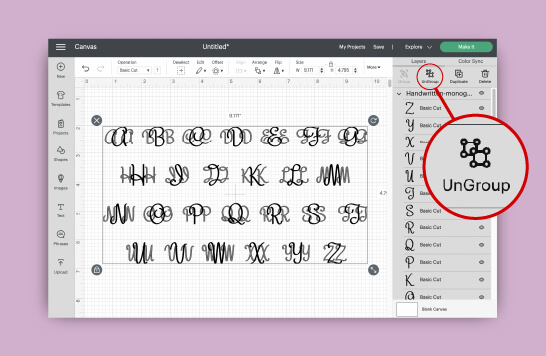
6. Ungroup all the letters.
You can do it by clicking the "Ungroup" button on the top above the layers panel on the right.
7. Select the desired initials.
Select by clicking on them while holding the "Shift" button (or "Ctrl" button if clicking on their corresponding layers instead).
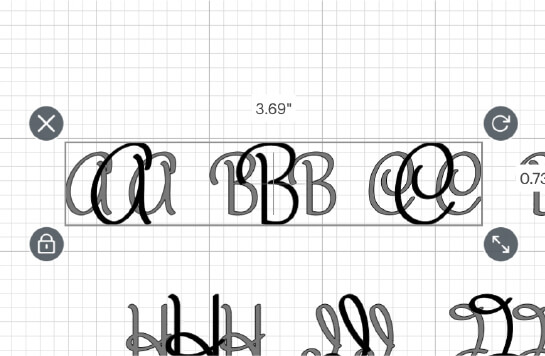
8. Separate the selected initials.
Move the selected letters away from the rest. Pro tip: use the keyboard arrows instead of mouse.
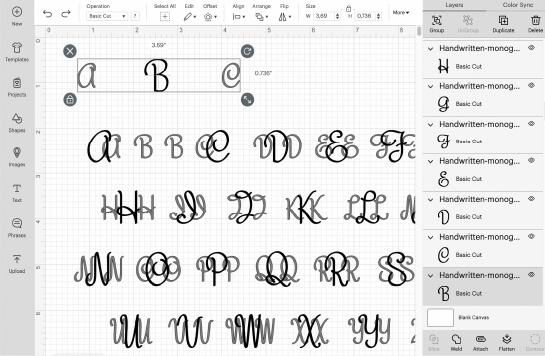
9. Delete the redundant elements.
Select all the unwanted letters with your mouse and delete them all by clicking on "Delete" button on your keyboard.
10. Combine your monogram.
Align the initials together to form your monogram. Pro Tip: Use keyboard arrows or hold the "Shift" button while moving the letters with mouse to preserve the original letter's vertical positioning.

11. Make the adjustments if needed.
Feel free to do any adjustments to the design such as scaling, repositioning, adding and removing the elements if needed.
12. Final cut preparations.
Prior cutting the monogram, make sure to use a "Weld" or "Attach" tool depending on whether the initials are touching (kissing) or not touching each other.
5. Bonus: Monogram from Regular Fonts
But what if you don't have any monogram fonts available or simply don't have any time to look around for one and want to make your Cricut monogram right away?
Here is a simple solution: use REGULAR fonts instead! You can use any free regular font or even one of your pre-installed system fonts to make a monogram in Cricut Design Space simply by adjusting the size and positioning of separate letter layers, or by combining two or more different font styles together.
Below is the example guide on how to use a regular fonts to make a monogram in Cricut Design Space.
1. Locate your font file.
Locate the downloaded true type font file. True type fonts are the files in either OTF or TTF format.

2. Install the font file.
Double click the font file and follow the on-screen prompts to install the font on your system. Pro tip: It might be necessary to restart your software or computer before using the font for the first time.
3. Open Cricut Design Space.
Start a new project by clicking "New Project" button in the top-right corner.
4. Replace Text with your own.
Click the "Text" icon in the left side panel and then replace word “Text” with you desired monogram initials combination (ABC).
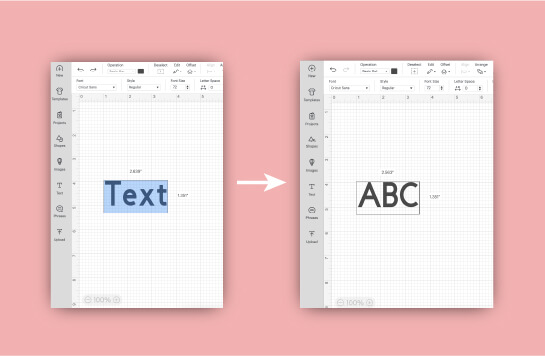
5. Select your desired font.
Click on the font drop down menu above the canvas field and then scroll down or use the search box to locate and select your installed font.
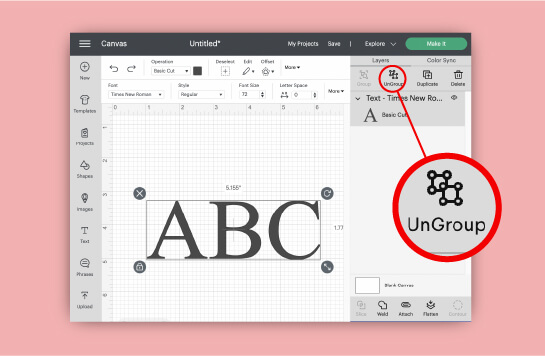
6. Ungroup all the letters.
Ungroup all the letters by clicking the "Ungroup" button on the top above the layers panel on the right.
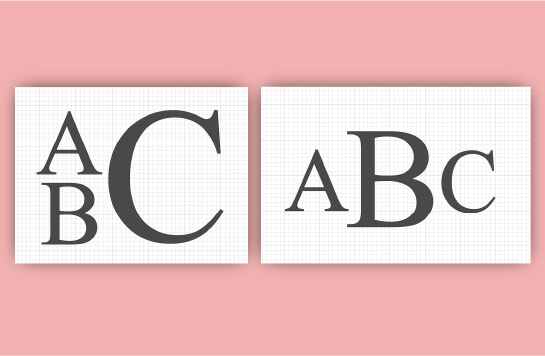
7. Make the required adjustments.
Select, scale and re-align individual initials to form a perfect monogram. Pro tip: use keyboard arrow buttons or mouse + "Shift" button combination to precisely move the letters around.
8. Final pre-cut preparations.
Prior cutting the monogram, make sure to use a "Weld" or "Attach" tool depending on whether the initials are touching (kissing) or not touching each other.
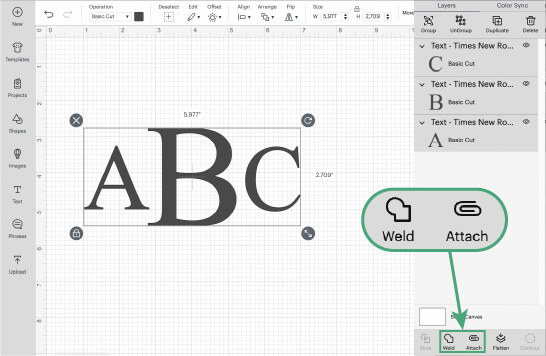
Enjoy
Finished reading? Now, head over to our Monogram Fonts and Monogram Maker sections and breathe life into your next Cricut monogram project!